Network Settings
This section describes the client’s general network settings.
Click or tap the Preferences button to open the Preferences window. Choose the Network tab.
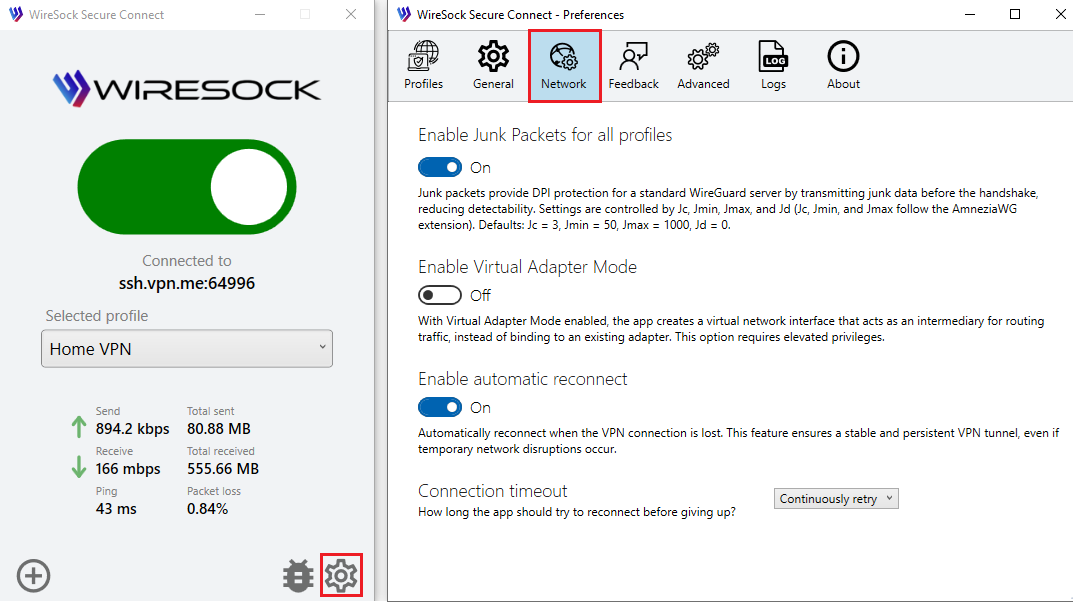
Apply DPI protection to all profiles
DPI Protection (Deep Packet Inspection) works with any WireGuard server. This section describes the global DPI protection techniques available in the Network settings: Junk Packets and Protocol Masking.
Magic Headers (AmneziaWG / Amnezia 2.0) are configured per profile and require matching server-side settings. See the profile DPI settings in Connection Profiles.

NOTE
You need to reconnect to the VPN server for these settings to take effect.
Override profile settings
DPI Protection settings can be configured individually for each profile or set globally for all profiles. If the Override profile settings with global ones option is enabled, the global settings will always be used, regardless of the profile-specific configuration.
Junk packets
Junk packets are dummy or random packets sent alongside real VPN traffic. Their purpose is to mask the traffic’s size, timing, and structure, making it more difficult for Deep Packet Inspection (DPI) systems to identify VPN usage. This reduces the risk of VPN traffic being detected or blocked. Junk packets are a DPI protection technique that works with standard WireGuard servers.
The behavior of junk packets is controlled by the following parameters: Jc, Jmin, Jmax, and Jd (where Jc, Jmin, and Jmax follow the AmneziaWG extension). Default values:
Jc= 3Jmin= 50Jmax= 1000Jd= 0
If Jc is set to 0 or is not specified, junk packets are not sent.
Jc - Junk packet count
- Description: The number of junk packets to send before the VPN session begins.
- Valid range: 0 to 200.
- Recommended value: 3 to 10.
- If Jc is set to zero then no junk packets are sent, and the protocol operates similarly to standard WireGuard.
Jmin - Minimum junk packet size
- Description: The minimum size (in bytes) for each junk packet.
- Valid range: 0 to 1280.
- Jmin is typically set to 50 bytes.
Jmax - Maximum junk packet size
- Description: The maximum size (in bytes) for each junk packet.
- Valid range: 0 to 1280.
- Jmax is typically set to 1000 bytes.
Jd - Junk packets send delay
- Description: Delay (in milliseconds) between junk packets sent before the handshake.
- Valid range: 0 to 200.
- Default value: 0
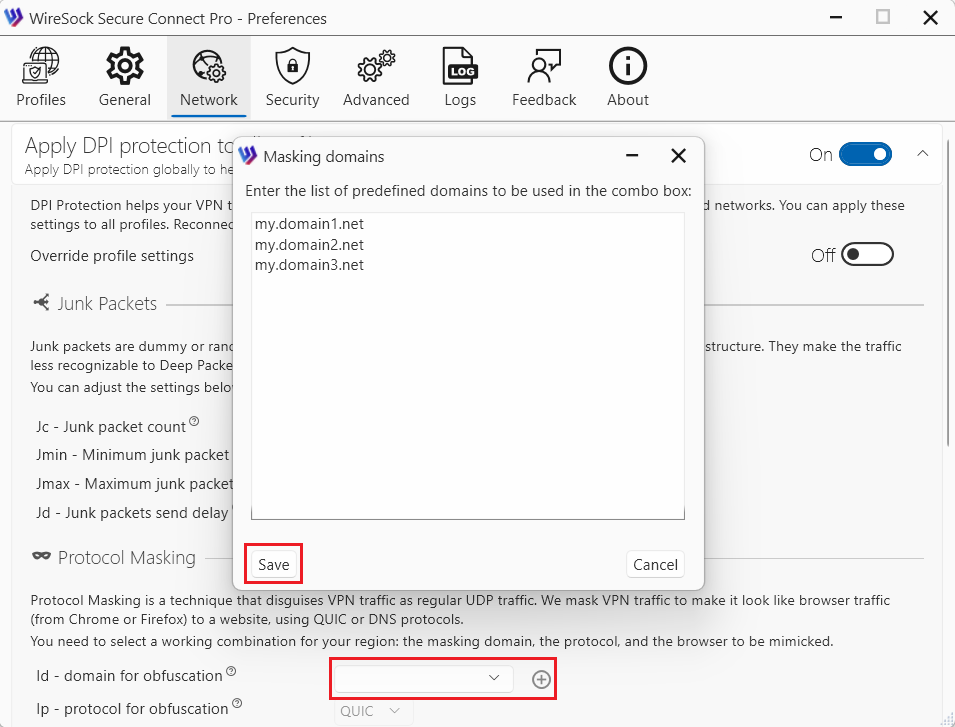
Protocol Masking
Protocol Masking is a technique that disguises VPN traffic as regular UDP traffic. In this mode, VPN traffic is made to look like typical browser traffic (for example, from Chrome or Firefox) communicating with a website using common protocols such as QUIC or DNS.
To use Protocol Masking effectively, you need to select a working combination for your region, including the masking domain, the protocol, and the browser profile to be mimicked.
Domain for masking
- Description: The domain name used to mask VPN traffic.
- Recommended value: It should be a popular domain in your region (for example, a major e-commerce platform).
Protocol for masking
- Description: The protocol used to mask VPN traffic.
- Supported protocols: QUIC and DNS.
Browser for masking
- Description: The browser used to mask VPN traffic.
- Valid options: Chrome, Firefox, cURL.
- This option is available only when the QUIC protocol is selected.
For your convenience, you can also manually add a list of masking domains and then select them from a drop-down list.
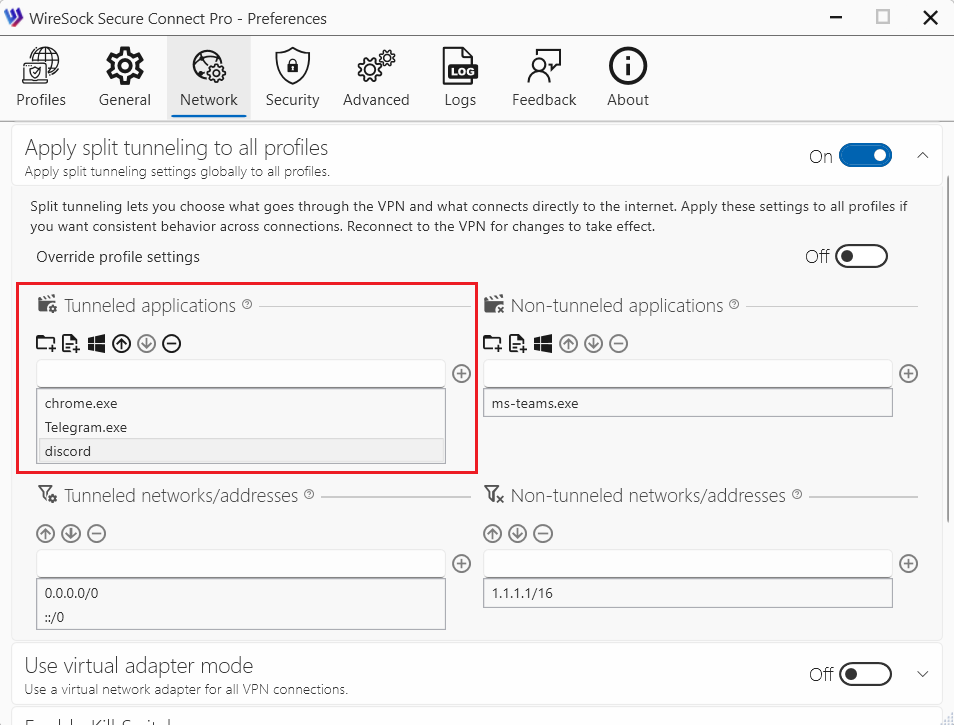
Apply split tunneling to all profiles
Split tunneling allows you to choose which traffic goes through the VPN tunnel and which traffic uses the regular Internet connection directly. This selective routing can help balance performance, privacy, and accessibility. You can enable Split-tunneling globally for all profiles, even if individual VPN profiles have their own parameters.

Using split tunneling settings, you can specify which applications and network addresses should use the VPN tunnel and which should bypass it.
NOTE
You need to reconnect to the VPN server for these settings to take effect.
If Split-tunneling settings are not defined in the profile, the client falls back to the global Split-tunneling settings. A profile is treated as having no Split-tunneling configuration when all of the following are true:
- Tunneled applications is empty
- Non-tunneled applications is empty
- Non-tunneled networks/addresses is empty
- Tunneled networks/addresses is empty or set to the default route (
0.0.0.0/0,::/0)
Profile and global Split-tunneling settings are not merged: no AND/OR combination logic is applied between them.
Override profile settings
Split-tunneling settings can be configured individually for each profile or set globally for all profiles. If the Override profile settings with global ones option is enabled, the global settings will always be used, regardless of the profile-specific configuration.
If Override profile settings with global ones is disabled, and Split-tunneling settings are defined in the profile, the profile settings are used.
Tunneled applications (optional)
Use this section to define which applications are allowed to use the VPN tunnel.
You can specify:
- a process name (the .exe extension is optional),
- the full path to an application executable, or
- the full path to a directory.
If an entry contains forward slashes (/) or backslashes (), it is treated as a full path. When you specify a directory path, all executable files located in that directory are automatically included.
NOTE
If no applications are specified, the VPN tunnel is available to all applications.
Examples:
- Full path:
C:\Program Files (x86)\Google\Chrome\Application\chrome.exe - Process names:
discord, chrome, firefox - All applications in Program Files folder:
C:\Program Files
Dependency: Must be paired with Tunneled networks/addresses to define the scope of traffic for these applications.
Example of configuration:
Type the application name in the edit box and add it to the list of allowed apps, or use the toolbar buttons:
 browse folder on the filesystem
 browse application executable file on the filesystem
 select running process name or path
Use the following buttons to move application up/down on the list of allowed apps or delete it from the list:
 move application up in the list of allowed applications
 move application down in the list of allowed applications
 remove application from the list of allowed applications
NOTE
You can use Tunneled networks/addresses and Tunneled applications at the same time, but their behavior follows an AND condition. This means that for traffic to be tunneled, it must match both of the following criteria:
- The destination IP address must be listed in Tunneled networks/addresses.
- The application generating the traffic must be listed in Tunneled applications.
Non-tunneled applications (Optional)
Use this section to specify applications that are not allowed to use the VPN tunnel.
You can specify:
- a process name (the .exe extension is optional),
- the full path to an application executable, or
- the full path to a directory.
NOTE
If both Tunneled applications and Non-tunneled applications are specified, Tunneled applications take priority and are evaluated first.
Examples:
- Full path:
C:\Program Files (x86)\Google\Chrome\Application\chrome.exe - Process names:
chrome, msoffice, firefox - All applications in Program Files folder:
C:\Program Files
Example of configuration:
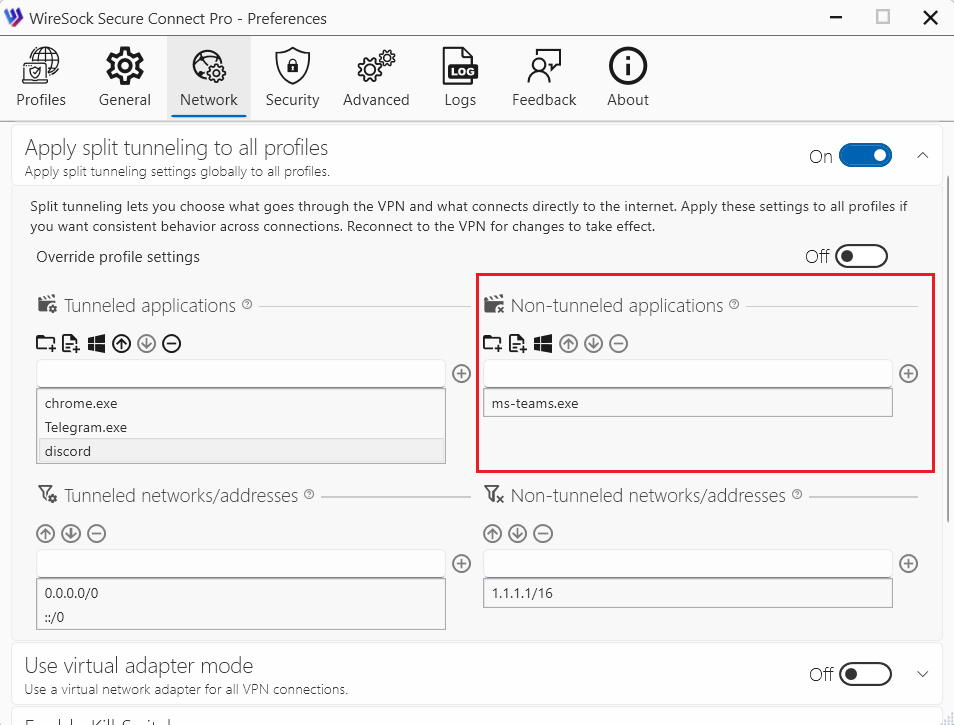
Type the application name in the edit box and add it to the list of disallowed apps, or use the toolbar buttons:
- browse folder on the filesystem
- browse application executable file on the filesystem
- select running process name or path
Use the following buttons to move application up/down on the list of disallowed apps or delete it from the list:
- move application up in the list of disallowed applications
- move application down in the list of disallowed applications
- remove application from the list of disallowed applications
Tunneled networks/addresses (required)
This setting defines which IP networks and addresses are allowed to communicate with a specific peer and determines what traffic is routed through the VPN tunnel. It effectively acts as both a routing table and an access control list.
- Example:
0.0.0.0/0, ::/0routes all traffic (IPv4/IPv6) through the VPN. - Example:
192.168.1.0/24routes only traffic destined for the 192.168.1.0/24 network through the VPN; other traffic uses the default gateway (split tunneling).
NOTE
Tunneled networks/addresses is a mandatory setting and cannot be left empty. The default value is 0.0.0.0/0, ::/0, which routes all local traffic through the VPN tunnel.
Example of configuration:
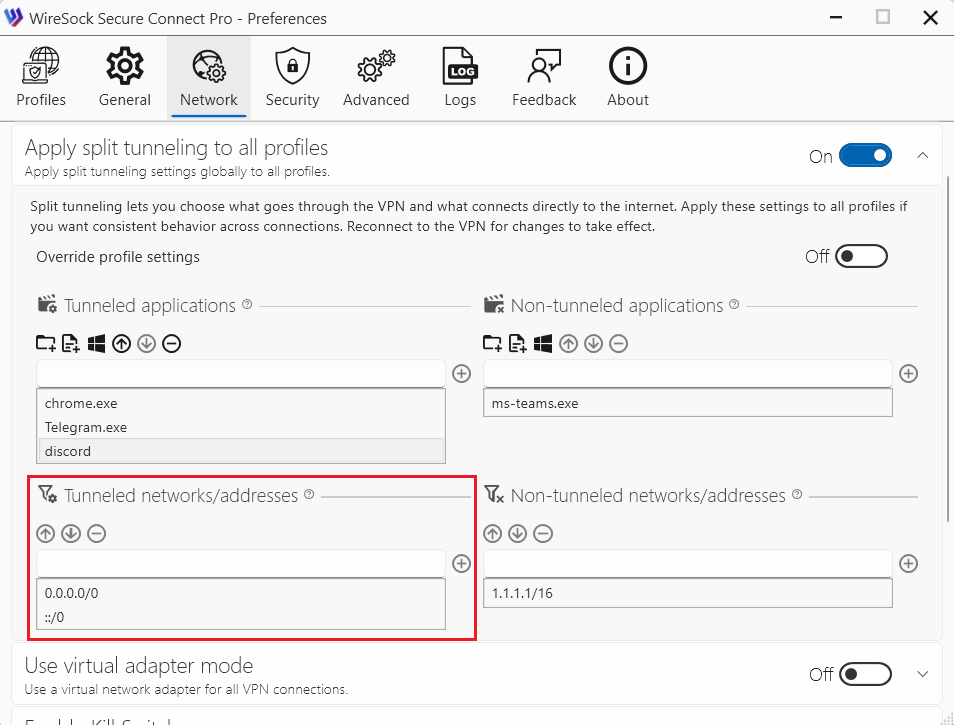
Type an IP address or network in the edit box and add it to the list.
Use the following buttons to move an entry up/down in the list or delete it:
- move the selected entry up
- move the selected entry down
- remove the selected entry
NOTE
You can use Tunneled networks/addresses and Tunneled applications at the same time, but their behavior follows an AND condition. This means that for traffic to be tunneled, it must match both of the following criteria:
- The destination IP address must be listed in Tunneled networks/addresses.
- The application generating the traffic must be listed in Tunneled applications.
Non-tunneled networks/addresses (Optional)
Use this setting to specify IP addresses or network ranges that should not be routed through the VPN tunnel.
This parameter explicitly excludes the listed IP addresses and ranges from VPN routing.
Example: If you want to access your local network directly (outside the VPN), you can exclude it by adding '192.168.1.0/24' to the Non-tunneled networks / addresses list.
NOTE
If Tunneled applications is configured, Non-tunneled networks/addresses will prevent the listed IP addresses and ranges from being routed through the VPN for those applications.
Example of configuration:
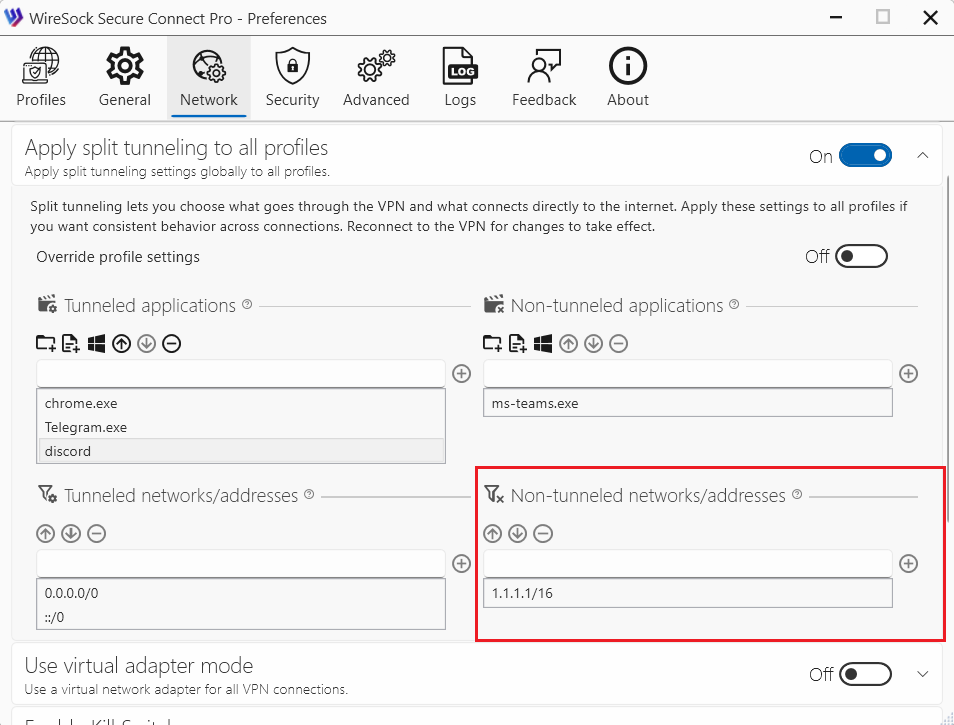
Type an IP address or network in the edit box and add it to the list.
Use the following buttons to move an entry up/down in the list or delete it:
- move the selected entry up
- move the selected entry down
- remove the selected entry
How WireSock Secure Connect handles tunneled and non-tunneled apps
WireSock Secure Connect determines whether a process is tunneled based on the tunneled apps and non-tunneled apps lists in the following order:
- If both
tunneled appsandnon-tunneled appsare undefined (empty), traffic from all processes istunneled. - If a process matches
tunneled apps, all its traffic istunneled. - If a process matches
non-tunneled apps, its traffic isexcluded from the tunnel. - If a process does not explicitly match either list, one of the following applies:
- If
tunneled appsis undefined/empty andnon-tunneled appscontains specific exclusions, the application istunneled. - If
non-tunneled appsis undefined/empty andtunneled appscontains specific inclusions, the application isnot tunneled. - If both
tunneled appsandnon-tunneled appsare defined (mixed policy), the application isnot tunneledunless explicitly included totunneled apps.
- If
Use virtual adapter mode
WireSock Virtual Adapter Mode creates a dedicated virtual network interface to handle VPN traffic, offering better isolation, compatibility, and control. Unlike Transparent Mode, which intercepts traffic at the packet level, Virtual Adapter Mode uses a standard network interface, enhancing compatibility with certain applications.
See more details about Virtual Adapter Mode and Transparent Mode in a separate article.
This setting can be configured per profile on the profile edit tab. If it is explicitly set in a profile, the profile setting takes precedence; otherwise, the global setting is used.
NOTE
You need to reconnect to the VPN server for these settings to take effect.
Enable Kill Switch
Kill Switch is a security mechanism that prevents your device’s network traffic from being transmitted outside the VPN tunnel. When Kill Switch is enabled:
- If the VPN connection is unexpectedly interrupted (for example, due to network issues, system sleep, or a service failure),
- Windows automatically blocks all incoming and outgoing network traffic,
- Network access is restored only after the VPN connection is re-established or Kill Switch is disabled.
Keep network blocked when VPN disconnects
Network traffic is blocked when the VPN is disconnected. This option becomes active after the first VPN connection.
NOTE
Important: with Network Lock enabled, DNS is not available while the VPN is disconnected - so please use the server IP address in the profile configuration instead of a DNS name.
Status indication and emergency unlock
When Kill Switch is enabled, the main application window shows a dedicated status panel indicating that Kill Switch protection is active.
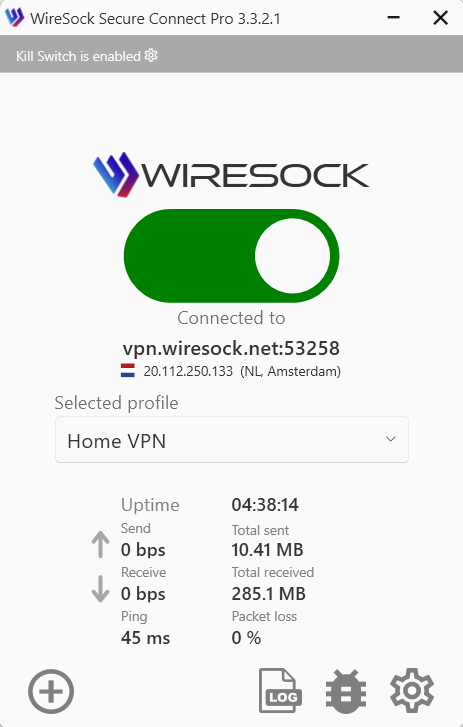
If network locking is currently engaged (for example, after an unexpected VPN disconnect), the main window also indicates that the network is locked.
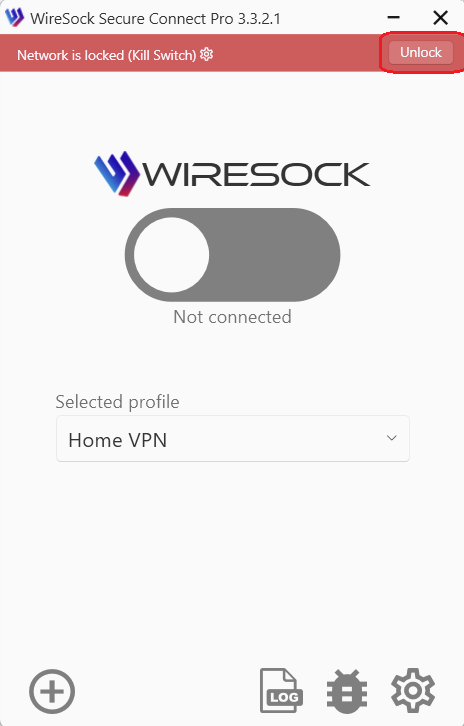
If you need to regain network connectivity immediately, use the Unlock button on this panel to manually clear the network lock. Unlock removes the lock temporarily but does not disable Kill Switch. Network locking may be applied again later according to your Kill Switch settings (for example, on the next disconnect).
Terminate TCP connections on connect
This feature closes all existing TCP sockets on your system when the VPN connects, based on the profile settings for tunneled apps and networks.
Some apps keep ongoing connections to certain IP addresses. When the VPN connects, those connections might stay open and continue sending data outside the VPN. This means your real IP address could still be exposed, even though the VPN is active. Turning on this feature closes all existing connections when the VPN starts, helping to prevent any data leaks.
TCP Socket Termination only terminates connections routed through the tunnel based on the split-tunneling settings.
Bypass LAN Traffic
The "Bypass LAN Traffic" option in WireSock Secure Connect allows your computer to communicate with other devices on your local network (LAN) while the VPN connection is active. This is useful for accessing local resources such as printers, file servers, or media devices (for example, Chromecast).
When this option is enabled, traffic to and from local IP ranges—including IPv4 link-local addresses, multicast addresses, and private networks defined by RFC 1918—is excluded from the VPN tunnel. As a result, local network devices remain accessible, while all other traffic continues to be routed through the VPN.
By default, LAN traffic is blocked when the VPN is active to improve security and prevent unintended access, especially on shared or public networks. Enabling this option is recommended only when connected to trusted networks.
This setting can be configured per profile on the profile edit tab. If the option is explicitly set in a profile, the profile setting takes precedence; otherwise, the global setting is applied.
NOTE
DNS requests still go through the VPN, so local hostnames may not resolve. Use IP addresses instead.
NOTE
You need to reconnect to the VPN server for these settings to take effect.
Which networks are excluded?
Local network addresses (RFC 1918, RFC 4193)
- 10.0.0.0/8
- 172.16.0.0/12
- 192.168.0.0/16
- 100.64.0.0/10
- fd00::/8
- 169.254.0.0/16
- ff02::/16
- 224.0.0.0/24
- 169.254.0.0/16
- fe80::/10
- 224.0.0.0/4
- ff00::/8
Enable automatic reconnect
When enabled, the client automatically reconnects if the VPN connection is lost. This helps maintain a stable and persistent VPN tunnel, even in the presence of temporary network disruptions.
Connection timeout
How long the app tries to connect to a VPN server before giving up. If set to Continuous Retry, the app retries indefinitely. Available options:
- 10 sec
- 30 sec
- 1 min
- 2 min
- Continuous Retry