Connection Profiles
A WireSock Secure Connect profile is the configuration text file (.conf) used to set up and define the parameters of a WireGuard VPN connection. It contains the necessary information to establish a secure connection between devices or peers, such as cryptographic keys, network settings, and other connection details.
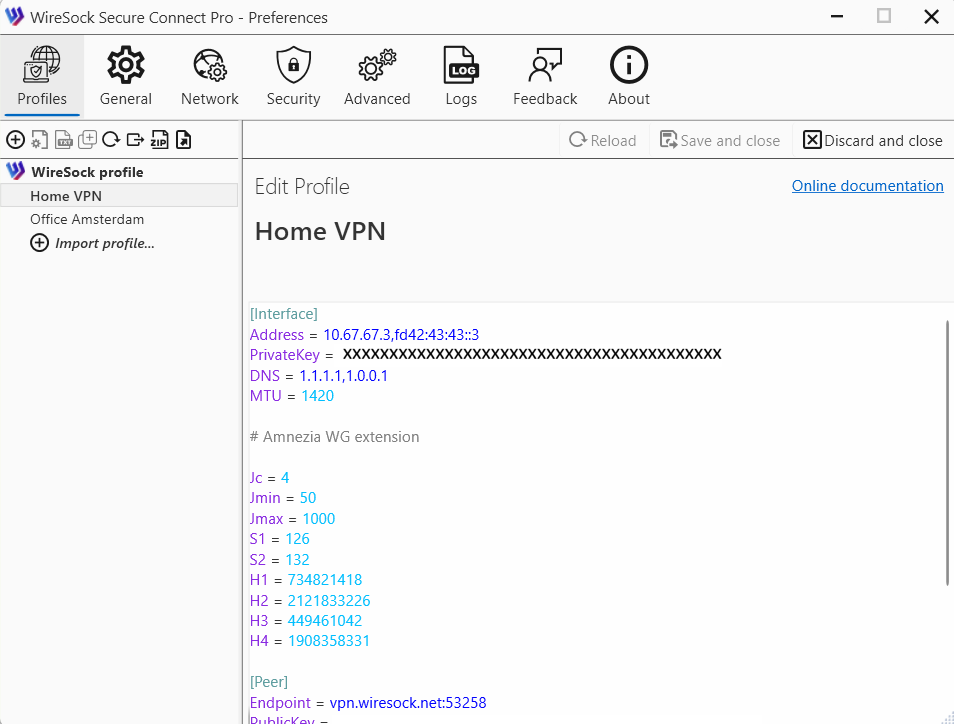
Configuration profile is typically divided into two main sections: [Interface] and [Peer]. See details about configuration file structure here.
How to Get Your Connection Profile
You need a connection profile to connect to a WireGuard protocol-compatible VPN server or service. This file contains the directives, parameters, and keys required to establish the client-server VPN connection.
NOTE
Important: WireSock Secure Connect works with all WireGuard protocol-compatible VPN servers or services but doesn't include a built-in VPN server. Instead, it is used to connect to your VPN service using a connection profile (.conf file).
WireSock Secure Connect supports standard WireGuard configuration files as well as Amnezia 2.0 configurations.
In addition, WireSock Secure Connect introduces private configuration parameters that enable advanced functionality, including DPI protection, split tunneling, and SOCKS5 proxy support.
Below, you'll find the options for getting your connection profile.
Using a VPN at work?
Your organization might use a WireGuard server. If you installed WireSock Secure Connect at the request of your IT department, contact them for instructions. They'll help you obtain your connection profile.
Using a WireGuard VPN service or a private server?
Request WireGuard configuration file from your VPN provider or check WireGuard site to understand how to configure your own WireGuard server and get config with client's profile.
Working with connection profiles
Wiresock Secure Connect allows to import, edit and delete connection profile.
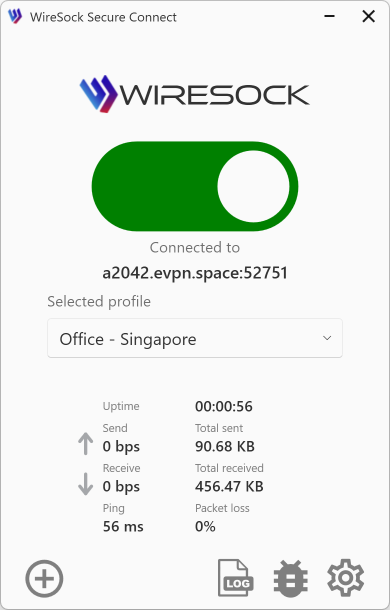
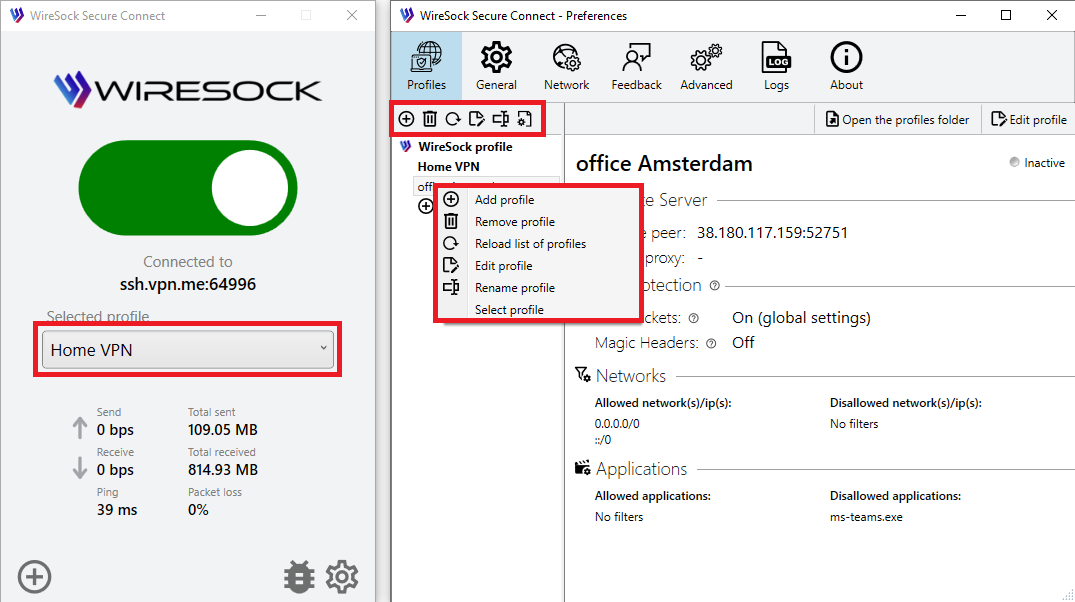
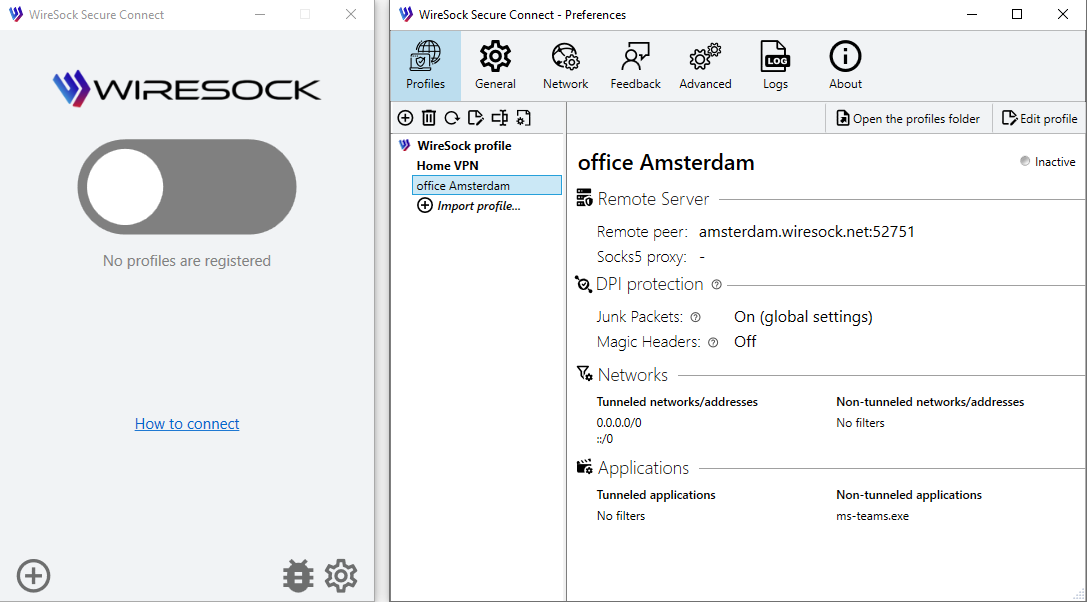
Select the connection profile using the combo box in the main window, the context menu in the profile list, or by double-clicking the profile name.
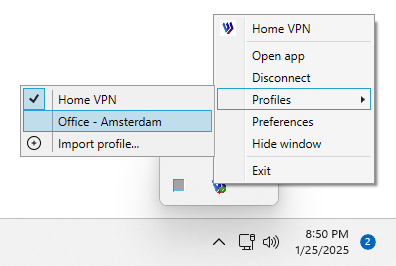
The selection of the connection profile is also available in the system tray context menu.
Import a Profile
You must import a connection profile to connect to a WireGuard server with WireSock Secure Connect from a file downloaded to your device.
To establish a connection to a server, you can import a connection profile file into WireSock Secure Connect by browsing for the file, or dragging and dropping it. Follow the steps below for the process of your choice.
- Obtain the WireGuard .conf file from the VPN server or provider.
- Save it to a location on your device.
- Launch WireSock Secure Connect.
- When the application is launched for the first time, it will automatically display a dialog prompting you to import a VPN profile.
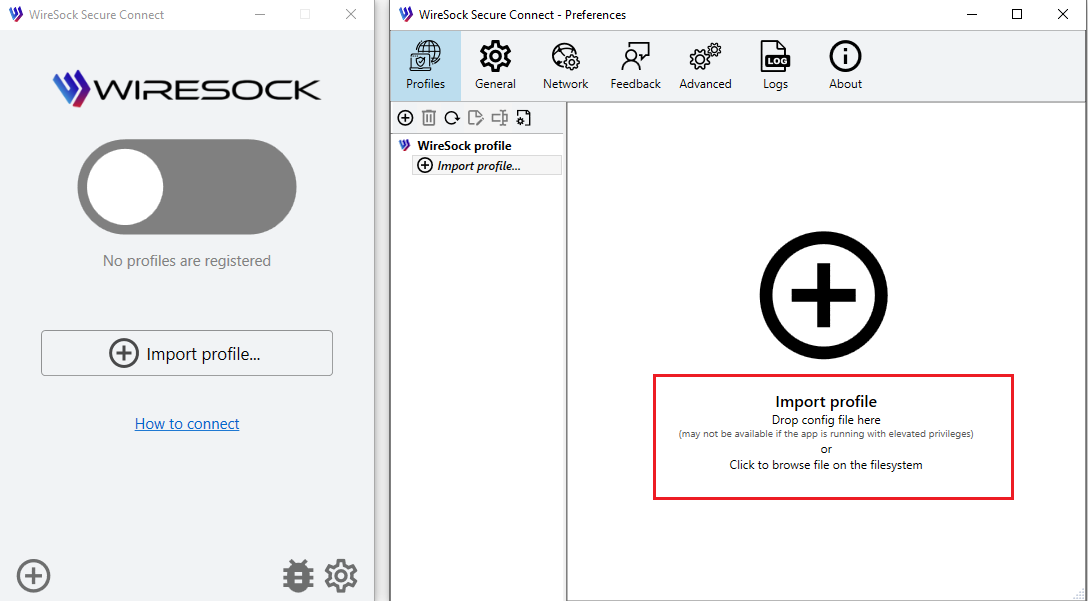
- Click
Browseto navigate to the .conf file and upload. - or drag and drop your .conf file to the screen.
NOTE
Important: You can import multiple profiles at once.
- You will see the imported profiles in the profile list on the left.
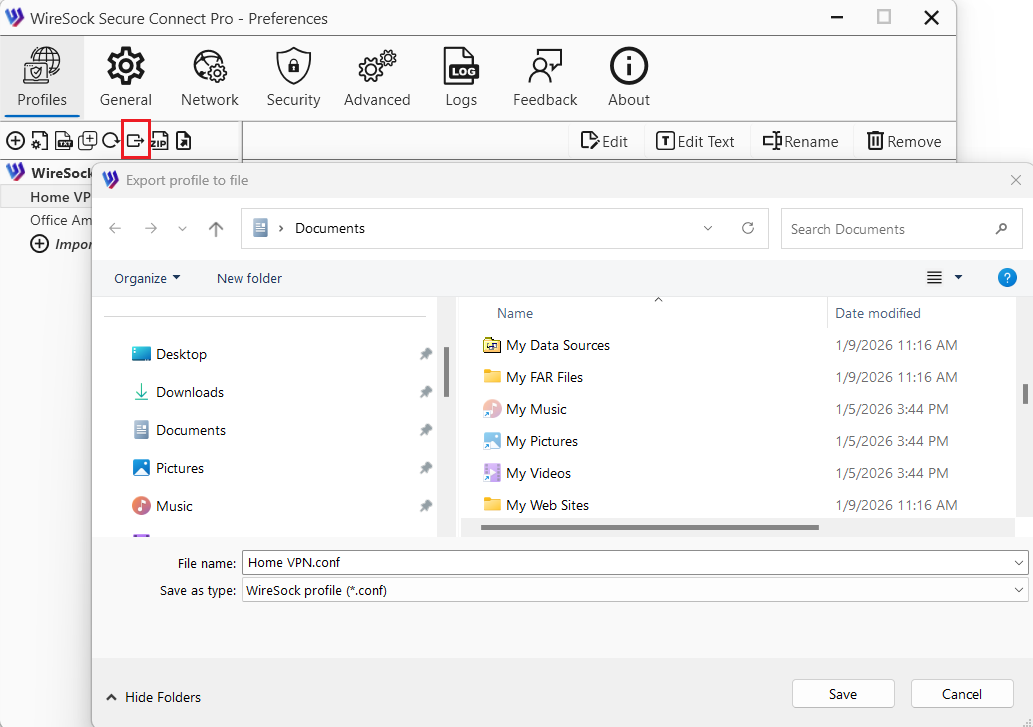
Export a profile
You can export a profile from the application as a file. To do this, select the profile from the list and click the Export button, or use the context menu. The application will export the profile and prompt you to save it to your local disk as a file.
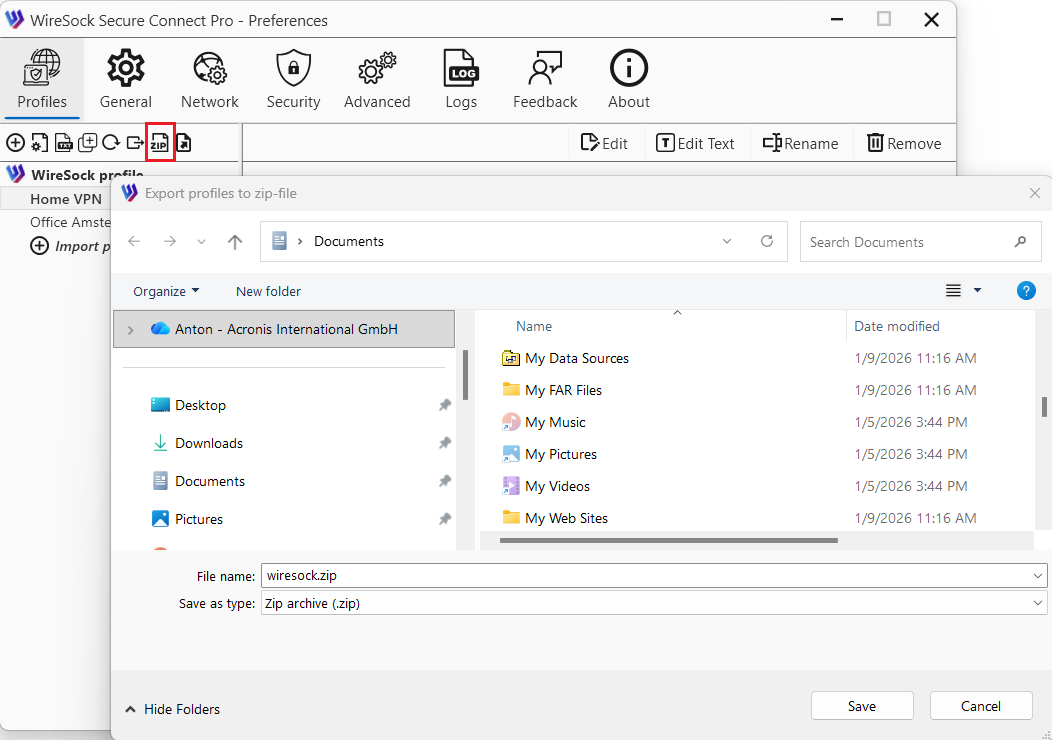
Export all profiles
You can export all profiles registered in the application as a single ZIP file. To do this, select any profile in the list and click Export profiles to zip-file, or use the context menu. The application will export all profiles into one ZIP archive and prompt you to save it to your local disk.
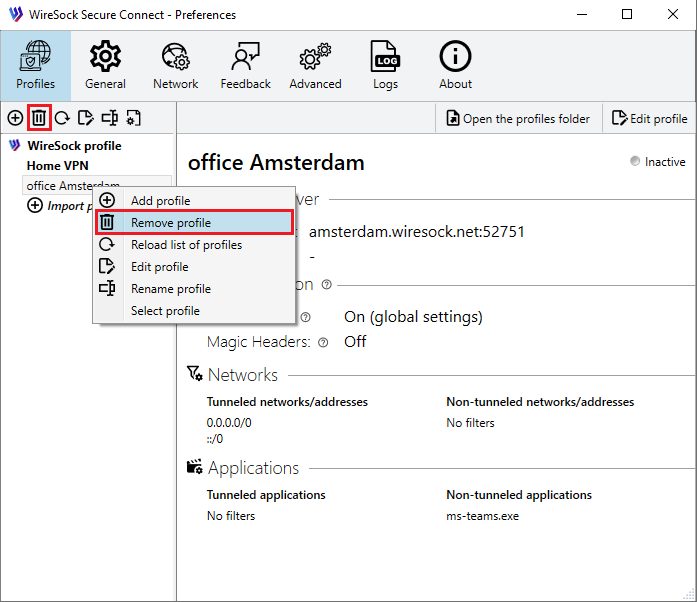
Remove a profile
Profile deletion is performed in the Preferences window on the Profiles tab.
Select the profile you want to remove and press the Remove button or use the context menu.
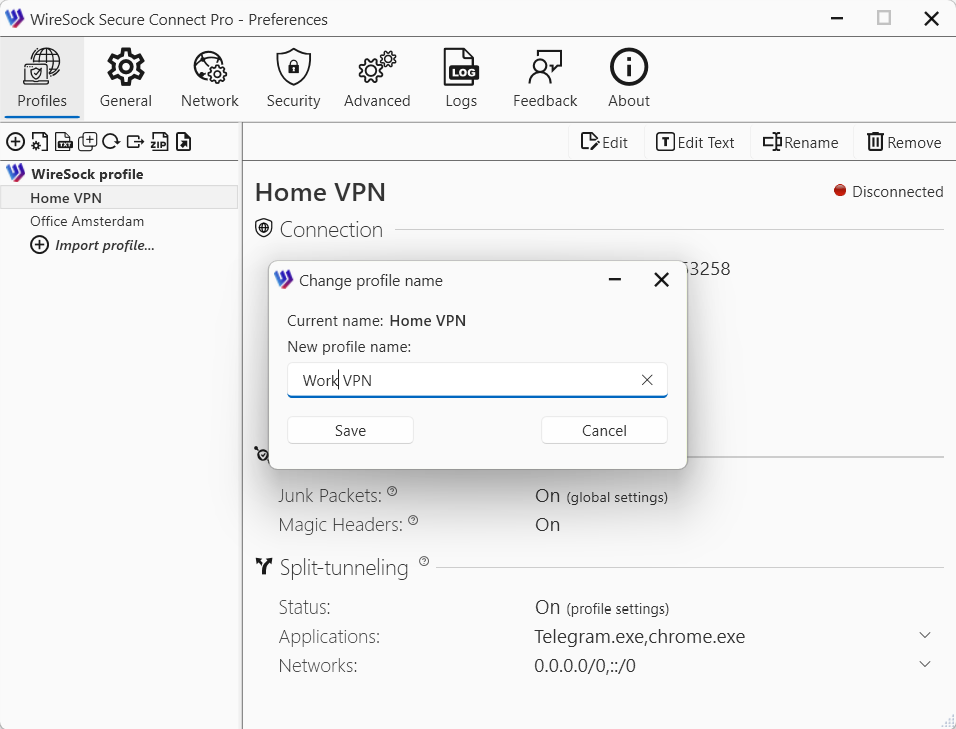
Rename a profile
You can rename a profile as long as it is not currently connected to a VPN server. To do this, select the profile from the list and click the Rename button, or use the context menu. In the dialog that opens, enter the new profile name and click Save.
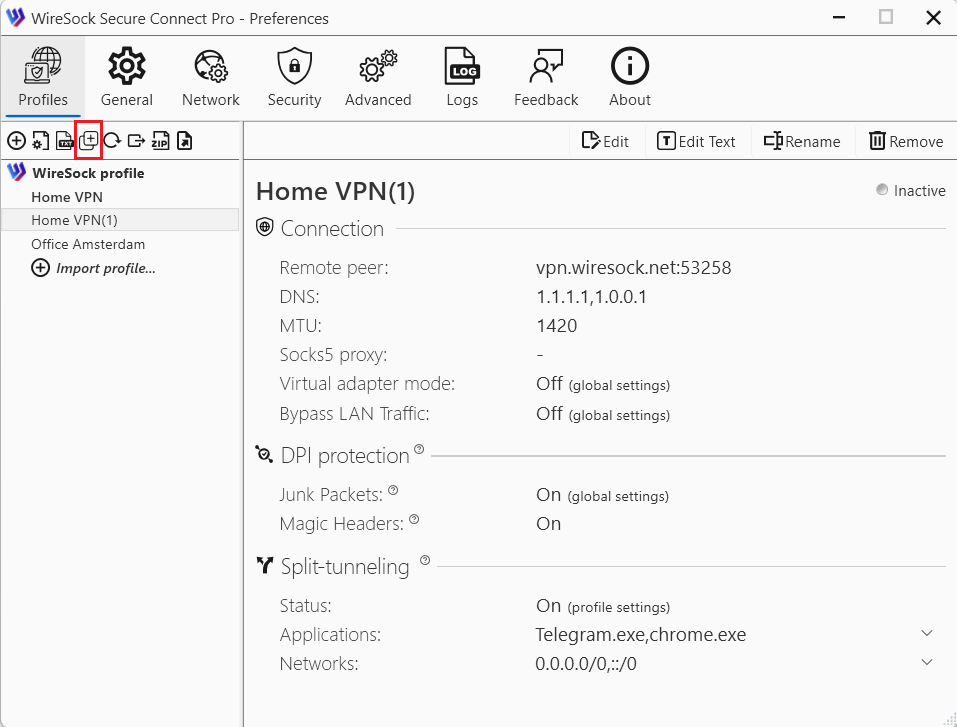
Duplicate a profile
You can duplicate a profile. To do this, select the profile from the list and click the Duplicate button, or use the context menu. The application will create a copy of the profile and save it with the name “original name (number)”, where the number is the first available sequential value starting from 1.
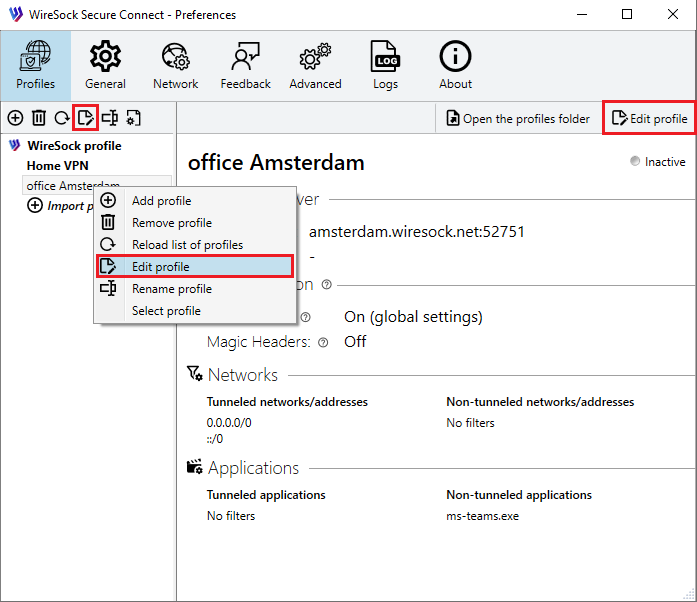
Edit a profile
Click the Preferences button to open the Preferences window and select the Profiles tab.
WireSock Secure Connect allows you to edit VPN profiles in two modes: using the setup wizard or in text mode.
NOTE
Text mode is intended for advanced users and allows manual editing of the profile contents. Using this mode requires an understanding of the configuration file format and its parameters.
To edit a profile using the wizard mode, select the profile you want to edit and click the Edit button on the toolbar, the Edit button in the profile window, or use the context menu in the profile list.
In the profile editing window, each group of settings is presented on a separate tab.
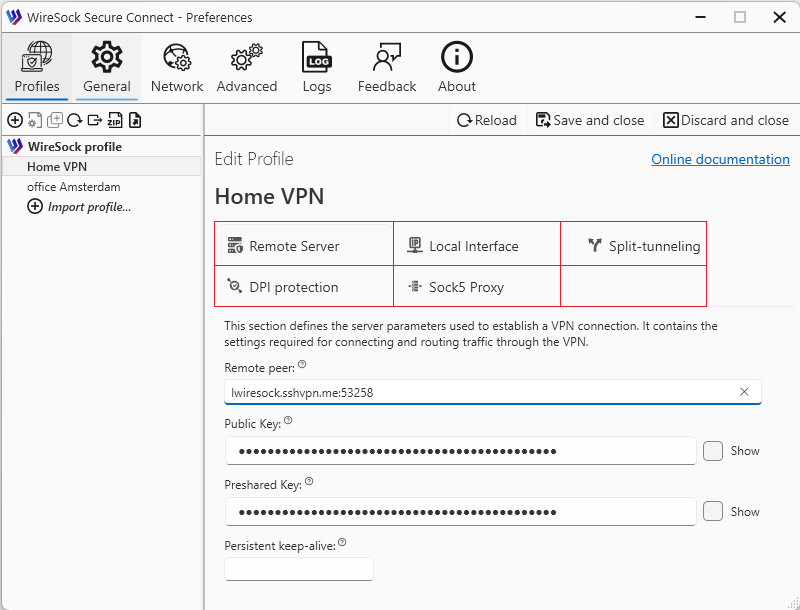
Remote Server
This tab contains the settings for remote peers, which are the WireGuard servers that the client connects to.
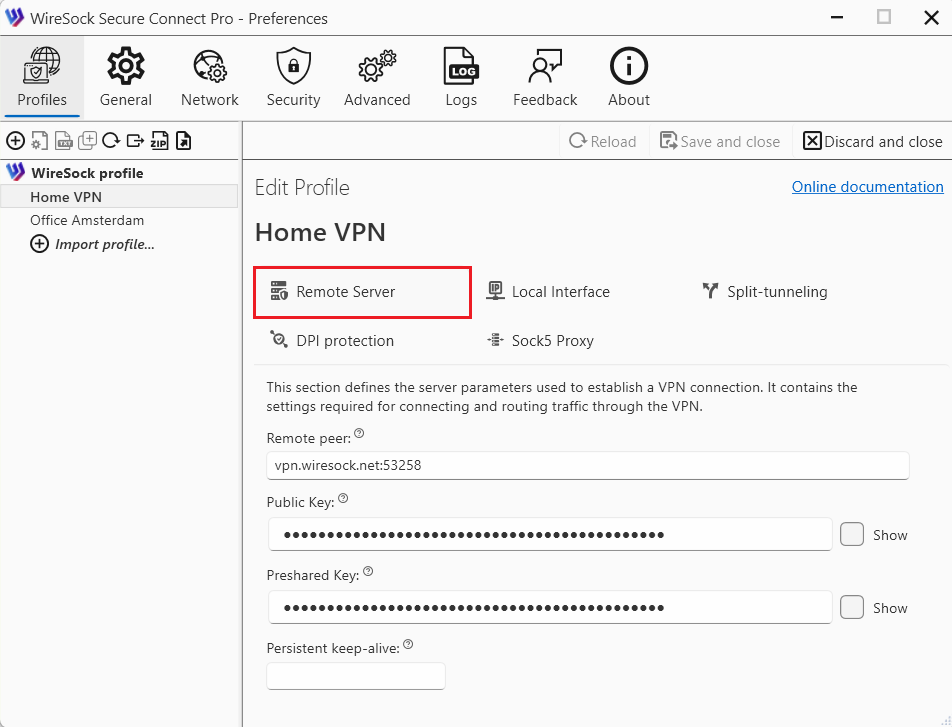
Remote peer (required):
- Description: The hostname or IP address and port of the remote peer. Required for peers that are not initiating connections.
- Purpose: Specifies where to send encrypted packets.
- Dynamic IPs: If the remote peer has a dynamic IP, consider using a dynamic DNS service.
- Example:
ini Endpoint = vpn.example.com:51820
PublicKey (required):
- Description: The public key of the remote peer, encoded in base64. Used for encrypting traffic to that peer.
- Purpose: Identifies the remote peer and encrypts data sent to it.
- Obtaining the Key: Should be securely shared by the remote peer.
- Example:
ini PublicKey = Ae4TbZPdsXPUrbIjkItC3aJ7bDtx4OCDfz7eS5Nh9ho=
PresharedKey (optional):
- Description: An additional layer of symmetric encryption using a pre-shared key. Must be the same on both peers.
- Purpose: Adds an extra layer of symmetric encryption.
- Generation: Can be generated using
wg genpsk. - Usage: Must be shared securely and set identically on both peers.
- Example:
ini PresharedKey = 6vqAaV2V5EnpNi5AqfZ57EKbQq8+OXRa5gAh+yOcRw=
PersistentKeepalive (optional):
- Description: Sends keepalive packets at the specified interval (in seconds) to maintain NAT mappings. Useful for peers behind NAT.
- Purpose: Maintains NAT mappings on routers/firewalls that may drop idle connections.
- Recommended Value:
25seconds is commonly used. - Example:
ini PersistentKeepalive = 25
Local interface
This tab contains settings for the local interface, including network configuration and cryptographic keys.
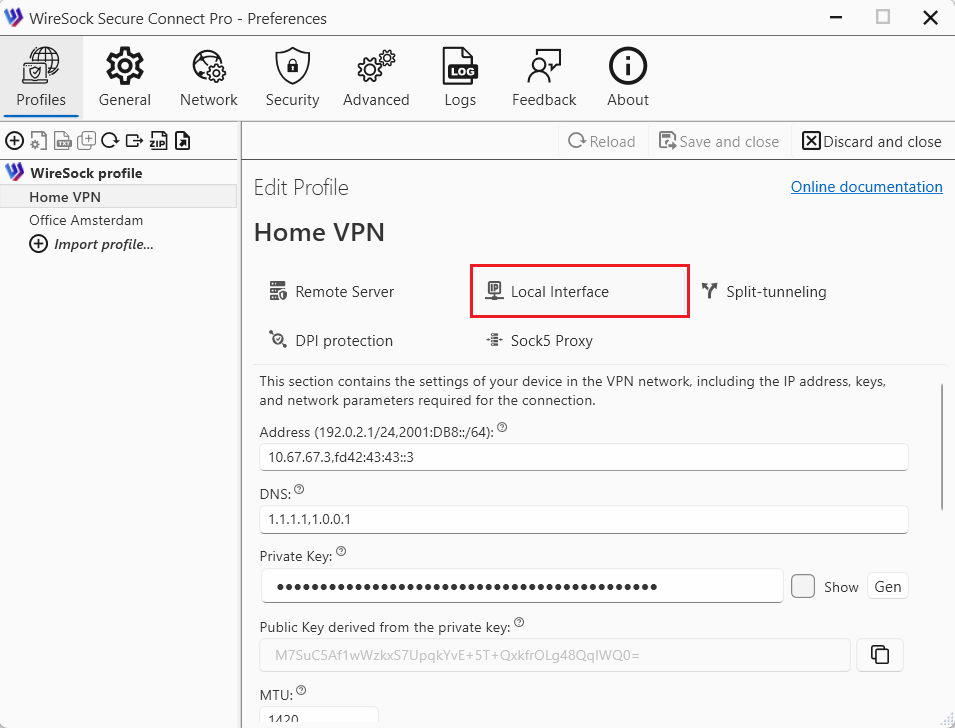
PrivateKey (required)
- Description: The private key of the local interface, encoded in base64. This key must remain secret.
- Purpose: Essential for establishing encrypted communication. Must be kept confidential.
- Generation: Can be generated using
wg genkey. - Usage: This key is specific to the local machine and should not be shared.
- Example:
ini PrivateKey = 6vAaW2V5EnpNi5AqfZ57EKbQq8+OXPxJ1qpAh+yOcQw=
Address (required)
- Description: IP address(es) assigned to the interface. Supports both IPv4 and IPv6, and multiple addresses can be specified, separated by commas.
- Purpose: Assigns IP addresses to the interface. These are the IPs that will be used within the VPN.
- Multiple Addresses: Supports multiple addresses for dual-stack IPv4/IPv6 setups.
- Example:
ini Address = 10.0.0.2/24, fd86:ea04:1115::1/64
ListenPort (optional)
- Description: The port on which the interface will listen for incoming WireGuard traffic. This is typically specified on servers.
- Purpose: Defines the port for incoming WireGuard traffic.
- Default Behavior: If not specified, WireGuard selects a random port.
- Firewall Considerations: Ensure this port is allowed through any firewalls.
- Example:
ini ListenPort = 51820
DNS (optional)
- Description: Specifies DNS server(s) to be used while the interface is up. Multiple DNS servers are separated by commas.
- Purpose: Sets DNS servers for name resolution while the interface is active.
- Client Configuration: Particularly useful for clients to resolve domain names over the VPN.
- Example:
ini DNS = 1.1.1.1, 8.8.8.8
MTU (optional)
- Description: Sets the Maximum Transmission Unit (MTU) for the interface. If not specified, WireGuard attempts to calculate an appropriate MTU.
- Purpose: Optimizes packet size to prevent fragmentation.
- Default Behavior: WireGuard auto-detects MTU, but manual setting can improve performance in some cases.
- Example:
ini MTU = 1420
PreUp, PostUp, PreDown, PostDown (optional)
- Description: Commands or scripts to execute before or after the interface is brought up or down. Useful for custom firewall rules or logging.
- Purpose: Automate tasks like configuring firewall rules or logging.
- Placeholders:
%ican be used as a placeholder for the interface name. - Example:ini
PostUp = Set-NetIPInterface -InterfaceAlias $env:WIRESOCK_TUNNEL_NAME -InterfaceMetric 0
(Set the metric to 0 for the virtual adapter after the connection is established)
Script execution timeout (optional)
- Description: The timeout of PreUp, PostUp, PreDown, PostDown scripts execution. The default value is 30 sec.
Virtual adapter mode (optional)
- Description: Virtual Adapter Mode can be configured per profile. If not set, the global configuration is used. See the Networking settings for more details.
Bypass LAN Traffic (optional)
- Description: Bypass LAN Traffic can be configured per profile. If not set, the global configuration is used. See the Networking settings for more details.
Split-tunneling
Split tunneling is a powerful VPN feature that allows users to choose which traffic goes through the secure VPN tunnel and which traffic accesses the internet directly. This selective routing helps balance performance, privacy, and accessibility, making it especially useful in both personal and enterprise VPN scenarios.
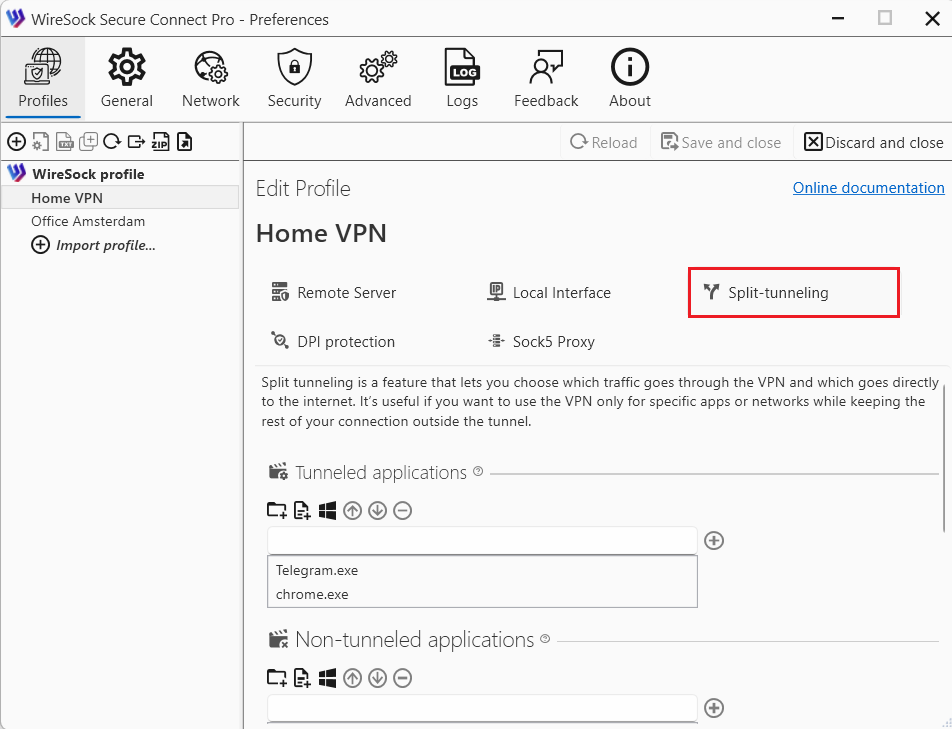
Using the split tunneling settings, you can specify which applications and network addresses should use the VPN tunnel and which should bypass it.
Tunneled applications (optional)
Use this section to define which applications are allowed to use the VPN tunnel.
You can specify:
- a process name (the .exe extension is optional),
- the full path to an application executable, or
- the full path to a directory.
If an entry contains forward slashes (/) or backslashes (), it is treated as a full path. When you specify a directory path, all executable files located in that directory are automatically included.
NOTE
If no applications are specified, the VPN tunnel is available to all applications.
Examples:
- Full path:
C:\Program Files (x86)\Google\Chrome\Application\chrome.exe - Process names:
discord, chrome, firefox - All applications in Program Files folder:
C:\Program Files
Dependency: Must be paired with Tunneled networks/addresses to define the scope of traffic for these applications.
Type your application name in the edit box and tap to add it to the list of allowed apps or use the buttons from toolbar:
 browse folder on the filesystem
 browse application executable file on the filesystem
 select running process name or path
Use the following buttons to move application up/down on the list of allowed apps or delete it from the list:
 move application up in the list of allowed applications
 move application down in the list of allowed applications
 remove application from the list of allowed applications
NOTE
You can use Tunneled networks/addresses and Tunneled applications at the same time, but their behavior follows an AND condition. This means that for traffic to be tunneled, it must match both of the following criteria:
- The destination IP address must be listed in Tunneled networks/addresses.
- The application generating the traffic must be listed in Tunneled applications.
Non-tunneled applications (Optional)
Use this section to specify applications that are not allowed to use the VPN tunnel.
You can specify:
- a process name (the .exe extension is optional),
- the full path to an application executable, or
- the full path to a directory.
NOTE
If both Tunneled applications and Non-tunneled applications are specified, Tunneled applications take priority and are evaluated first.
Examples:
- Full path:
C:\Program Files (x86)\Google\Chrome\Application\chrome.exe - Process names:
chrome, msoffice, firefox - All applications in Program Files folder:
C:\Program Files
Type your application name in the edit box and tap  to add it to the list of disallowed apps or use the buttons from toolbar:
- browse folder on the filesystem
- browse application executable file on the filesystem
- select running process name or path
Use the following buttons to move application up/down on the list of disallowed apps or delete it from the list:
- move application up in the list of disallowed applications
- move application down in the list of disallowed applications
- remove application from the list of disallowed applications
Tunneled networks/addresses (required)
This setting defines which IP networks and addresses are allowed to communicate with a specific peer and determines what traffic is routed through the VPN tunnel. It effectively acts as both a routing table and an access control list.
- Example:
0.0.0.0/0, ::/0routes all traffic (IPv4/IPv6) through the VPN. - Example:
192.168.1.0/24routes only traffic destined for the 192.168.1.0/24 network through the VPN; other traffic uses the default gateway (split tunneling).
NOTE
Tunneled networks/addresses is a mandatory setting and cannot be left empty. The default value is 0.0.0.0/0, ::/0, which routes all local traffic through the VPN tunnel.
Type ip/network in the edit box and tap to add it to the list of disallowed ips.
Use the following buttons to move ip/networkip range up/down on the list of disallowed ips or delete it from the list:
- move ip/network up in the list of disallowed ips
- move ip/network down in the list of disallowed ips
- remove ip/network from the list of disallowed ips
NOTE
You can use Tunneled networks/addresses and Tunneled applications at the same time, but their behavior follows an AND condition. This means that for traffic to be tunneled, it must match both of the following criteria:
- The destination IP address must be listed in Tunneled networks/addresses.
- The application generating the traffic must be listed in Tunneled applications.
Non-tunneled networks/addresses (Optional)
Use this setting to specify IP addresses or network ranges that should not be routed through the VPN tunnel.
This parameter explicitly excludes the listed IP addresses and ranges from VPN routing.
Example: If you want to access your local network directly (outside the VPN), you can exclude it by adding '192.168.1.0/24' to the Non-tunneled networks / addresses list.
NOTE
If Tunneled applications is configured, Non-tunneled networks/addresses will prevent the listed IP addresses and ranges from being routed through the VPN for those applications.
Type ip/network in the edit box and tap to add it to the list of disallowed ips.
Use the following buttons to move ip/networkip range up/down on the list of disallowed ips or delete it from the list:
- move ip/network up in the list of disallowed ips
- move ip/network down in the list of disallowed ips
- remove ip/network from the list of disallowed ips
How WireSock Secure Connect handles tunneled and non-tunneled apps
For the priority rules between Tunneled applications and Non-tunneled applications, see Network Settings.
DPI protection
This tab contains settings designed to evade or bypass Deep Packet Inspection (DPI) mechanisms used by network operators, ISPs, or firewalls to detect, throttle, or block VPN traffic. Currently, WireSock Secure Connect supports several DPI protection techniques, including Junk Packets, Magic Headers and Protocol Masking.
Junk Packets and Protocol Masking are compatible with standard WireGuard servers. Magic Headers (AmneziaWG / Amnezia 2.0) are configured per profile and require matching server-side settings.
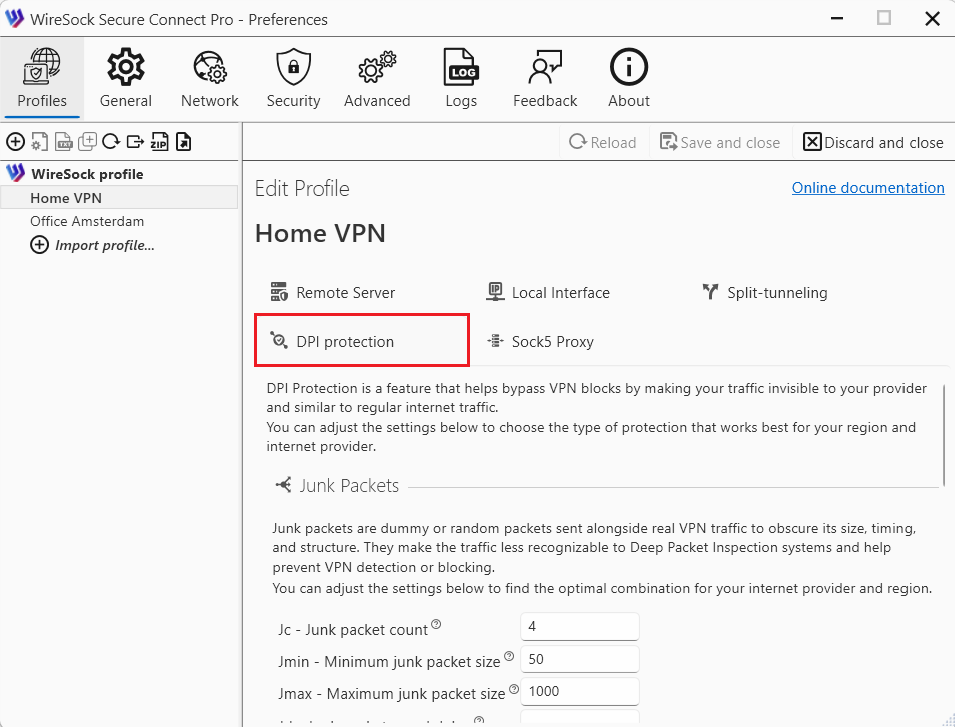
Junk Packets
Junk packets are dummy or random packets sent alongside real VPN traffic. Their purpose is to mask the traffic’s size, timing, and structure, making it more difficult for Deep Packet Inspection (DPI) systems to identify VPN usage. This reduces the risk of VPN traffic being detected or blocked. Junk packets are a DPI protection technique that works with standard WireGuard servers.
The behavior of junk packets is controlled by the following parameters: Jc, Jmin, Jmax, and Jd (where Jc, Jmin, and Jmax follow the AmneziaWG extension). Default values:
Jc= 3Jmin= 50Jmax= 1000Jd= 0
If Jc is set to 0 or is not specified, junk packets are not sent.
Jc - Junk packet count
- Description: Junk packet count (Jc) specifies the number of junk packets to send before the actual VPN session begins.
- Valid range: 0 to 200.
- Recommended value: Jc = 3-10.
- If Jc is set to zero then no junk packets are sent, and the protocol operates similarly to standard WireGuard.
Jmin - Minimum junk packet size
- Description: Junk packet minimum size (Jmin) - defines the minimum byte sizes for each junk packet.
- Valid range: 0 to 1280.
- Jmin is typically set to 50 bytes.
Jmax - Maximum junk packet size
- Description: Junk packet maximum size (Jmax) - defines the maximum byte sizes for each junk packet.
- Valid range: 0 to 1280.
- Jmax is typically set to 1000 bytes.
Jd - Junk packets send delay
- Description: Junk packets delay (Jd) - delay (in milliseconds) between junk packets sent before the handshake.
- Valid range: 0 to 200.
- Default value is 0
Magic Headers (AmneziaWG)
Magic Headers are a feature of the AmneziaWG protocol that enhance traffic obfuscation by adding random data to handshake packets and modifying specific WireGuard fields. This makes VPN traffic resemble other network protocols, helping it avoid detection. All parameters (S1, S2, S3, S4 H1, H2, H3, and H4) must be specified for a valid Amnezia configuration.
If both S1 and S2 are set to 0, no headers will be added.
NOTE
Important:
- Magic Headers must be set on both client and server and are incompatible with standard WireGuard servers.
- All parameters S1-S4, H1-H4 must not be empty to configure Magic Headers.
NOTE
For the most up-to-date information about the S1–S4 and H1–H4 parameters, please refer to the official Amnezia documentation
S1 - Init handshake padding
- Description: Init packet junk size (S1) determines the amount of random data appended to the initiation handshake packet, altering its size to evade detection.
- If not specified, S1 defaults to 0, meaning no additional junk data is added.
S2 - Response handshake padding
- Description: Response packet junk size (S2) specifies the amount of random data added to the response handshake packet, modifying its size for obfuscation.
- If not set, S2 defaults to 0, indicating no additional junk data is appended.
S3 - Cookie message padding
- Description: Adds padding to the handshake response to reduce protocol fingerprinting.
- Use small/random values.
S4 - Transport packet padding
- Description: Adds padding to data packets to obscure traffic patterns.
- Avoid large values
H1 - Init handshake header value
- Description: Init packet magic header (H1) sets a custom header for the initial handshake packet sent from the client to the server.
- Valid range: 1 to 4,294,967,295 (32-bit unsigned integer).
- Can be represented in various numerical formats, including hexadecimal.
- Must be unique and match server value
H2 - Handshake response header value
- Description: IResponse Packet Magic Header (H2) defines a custom header for the handshake response packet sent from the server to the client.
- Valid range: 1 to 4,294,967,295 (32-bit unsigned integer).
- Can be represented in various numerical formats, including hexadecimal.
- Must be unique and match server value
H3 - Cookie message header value
- Description: Transport Packet Magic Header (H3) specifies a custom header for data packets transmitted during the VPN session.
- Valid range: 1 to 4,294,967,295 (32-bit unsigned integer).
- Can be represented in various numerical formats, including hexadecimal.
- must be unique and match server value
H4 - Transport packet header value
- Description: Underload Packet Magic Header (H4) Sets a custom header for underload packets, which are specific control packets used within the AmneziaWG protocol.
- Valid range: 1 to 4,294,967,295 (32-bit unsigned integer).
- Can be represented in various numerical formats, including hexadecimal.
- Must be unique and match server value
Protocol Masking
Protocol Masking is a technique that disguises VPN traffic as regular UDP traffic. In this mode, VPN traffic is made to look like typical browser traffic (for example, from Chrome or Firefox) communicating with a website using common protocols such as QUIC or DNS.
To use Protocol Masking effectively, you need to select a working combination for your region, including the masking domain, the protocol, and the browser profile to be mimicked.
Id - domain for obfuscation
- Description: The domain name used to mask VPN traffic.
- Recommended value: It should be a popular domain in your region (for example, a major e-commerce platform).
Ip - protocol for obfuscation
- Description: The protocol used to mask VPN traffic.
- Supported protocols: QUIC and DNS.
Ib - browser for obfuscation
- Description: The browser used to mask VPN traffic.
- Valid options: Chrome, Firefox, cURL.
- This option is available only when the QUIC protocol is selected.
SOCKS5 Proxy
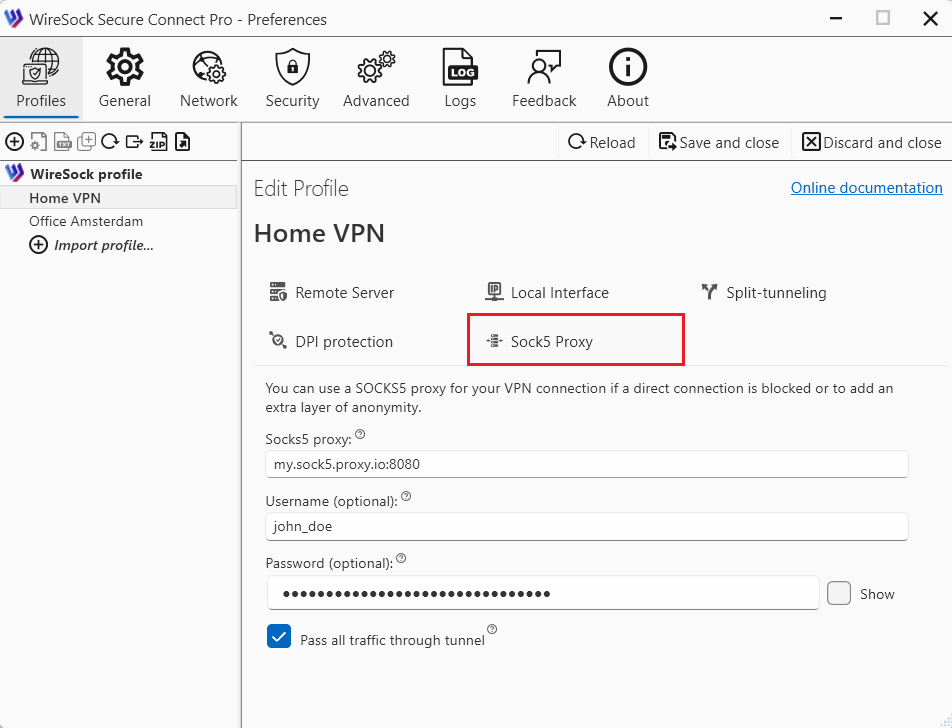
For users who need to route the WireGuard handshake through a SOCKS5 proxy, the following additional parameters are available:
- Socks5Proxy: Set the SOCKS5 proxy endpoint, e.g.,
socks5.sshvpn.me:1080or an IP-based endpoint like13.134.12.31:1080. - Socks5ProxyUsername: (Optional) Specify the proxy username.
- Socks5ProxyPassword: (Optional) Specify the proxy password.
- Socks5ProxyAllTraffic: (Optional) When set to
true(e.g.,Socks5ProxyAllTraffic = true), it forces all WireGuard traffic through the SOCKS5 proxy, effectively masking it from DPI detection.
Editing a profile in text mode
Text mode editing is intended for advanced users who are familiar with the WireGuard and WireSock configuration file formats. The application highlights incorrectly entered parameters in red and prevents the profile from being saved if any errors are present.
NOTE
Unlike the wizard mode, text mode allows you to preserve comments in the profile. In wizard mode, comments are not preserved and are overwritten.